Have you ever wondered how a flat sheet of paper turns into the sturdy cup you hold every morning? Behind that simple disposable cup lies a fascinating sequence of mechanical precision, heat sealing, and high-speed automation. Whether you are starting a cup manufacturing business or looking to upgrade your existing line, understanding the inner workings of paper cup forming equipment is the first step toward better output quality and lower waste.

The Core Principle: From Flat Paper to 3D Cup
At its heart, a cup forming machine performs three main actions: feeding and cutting the paper blank, forming and sealing the side wall, and attaching and curling the bottom. Although different models vary in speed and automation, the basic workflow remains consistent across most industrial equipment.
Let’s walk through each stage in detail – including common pitfalls and how to avoid them.
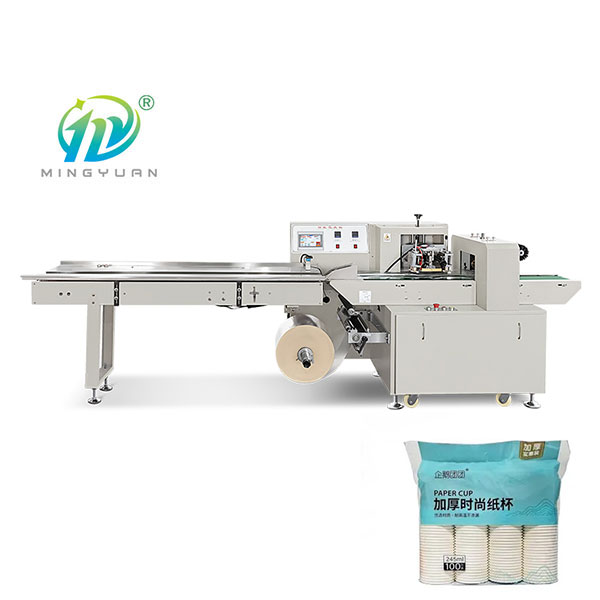
Step 1: Paper Roll Feeding and Die Cutting
The process starts with a large roll of polyethene-coated paper (PE paper). The machine pulls the paper through a series of tension rollers to keep it flat and wrinkle-free. A rotary die cutter then stamps out a trapezoidal or fan-shaped blank – each blank will become one cup.
Why shape matters: The fan shape creates the tapered body of a typical disposable cup. If the cutting die is dull or misaligned, you will get irregular edges that lead to leaking side seams.
Pro tip from shop floor experience: Always check the paper roll’s tension before starting a shift. Too loose, and you get folds; too tight, and the paper may tear during high-speed running.
Step 2: Side Wall Formation and Ultrasonic/Hot Air Sealing
The cut blank is wrapped around a mandrel (a tapered metal cylinder that defines the cup’s inner shape). Overlapping edges are joined using either hot air or ultrasonic sealing – both methods melt the PE coating to create a watertight bond without glue.
Hot air sealing: Blows heated air (typically 400–600°C) onto the overlapping area, then presses with a cold roller to solidify.
Ultrasonic sealing: Uses high-frequency vibrations to generate friction heat inside the PE layer. This method is cleaner and consumes less energy.
Most modern cup forming equipment now adopts ultrasonic sealing because it produces stronger seams and requires less warm-up time. However, hot air systems remain common for very high-speed lines (over 150 cups per minute).
Potential issue: If the sealing temperature is too low, the side seam will peel apart when filled with hot liquid. Too high, and it burns the paper, creating a weak spot. You need a consistent temperature control system – learn more about precise temperature parameters and how automated controllers solve this.
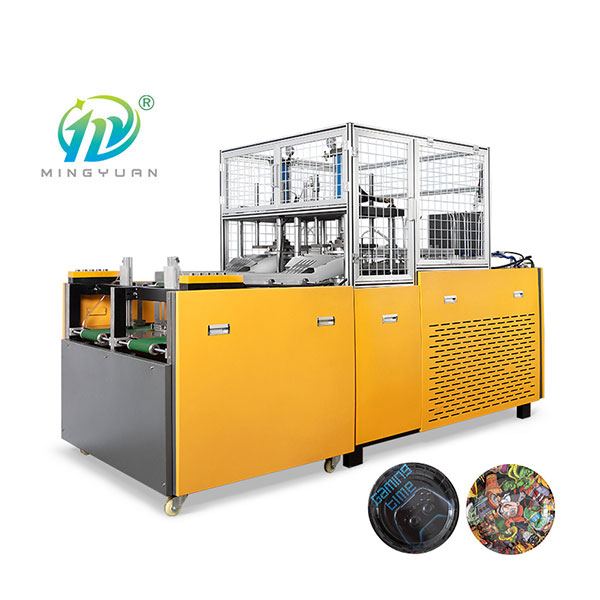
Step 3: Bottom Curling and Attachment
Now the cup body is a hollow, tapered tube, but it has no bottom. The machine cuts a round bottom blank from the same PE paper, then uses a series of punches and heating elements to attach it to the lower edge of the body.
Here’s the sequence:
The bottom blank is placed inside a bottom heating station, where hot air melts the PE coating along the rim.
A knurling wheel presses the bottom against the body, creating a mechanically interlocked and thermally bonded joint.
The assembly moves to a cooling station to set the bond.
A poor bottom seal is the #1 reason for cup leakage. In many low-quality machines, the pressure between the knurling wheel and the bottom die is inconsistent, leading to partial bonding. Industrial-grade equipment uses servo-controlled pressure systems to maintain uniformity across every cycle.
Step 4: Curling the Top Edge (Rim Curling)
The top edge of a paper cup is not a raw cut – it is rolled into a smooth, rounded rim. This curling step serves two purposes: it strengthens the rim so the cup doesn’t collapse when squeezed, and it provides a comfortable mouthfeel.
The machine passes the cup under a curling head that rotates and gradually bends the edge inward. The number of curling passes (usually 3–5) determines how tight and circular the rim becomes. If your cups feel sharp or crack easily, the curling die may be worn out.
Step 5: Stacking and Collection
Finished cups drop onto a star wheel or conveyor belt for stacking. High-speed lines can produce 80–120 cups per minute from a single lane, while dual-lane systems double that output. Some advanced cup-making lines include automatic counting and packing stations – check how automated stacking reduces manual labour and counting errors.
Common Operational Mistakes That Waste Production Time
Even with well-built cup-forming equipment, operators often make three mistakes that increase scrap rates:
| Mistake | Consequence | Fix |
| Ignoring edge trim dust | Dust accumulates on sealing surfaces → weak seams | Install a vacuum dust collector near the cutting station |
| Running PE paper below spec thickness | Bottom pops out under hot liquid | Always use paper with correct grammage (typically 170–300 gsm) |
| Skipping daily mandrel cleaning | Resin buildup changes cup taper → jamming | Clean mandrels with non-abrasive solvent every 8 hours |
Industry standard reference (ISO 536) defines paper grammage testing methods – we recommend verifying every new batch of paper rolls before production.
How to Extend the Lifespan of Your Cup Forming Line
After understanding the working principles, you may want to know how to keep your machine running reliably for years. Here are three advanced maintenance tips:
Lubricate cam followers weekly – Most cup machines use cams to drive punches and sealing heads. Dry cams cause erratic timing and broken punches.
Check ultrasonic generator calibration every 500 hours – A drifting frequency reduces seam strength by up to 40% before any alarm triggers.
Replace bottom knurling wheels after 2 million cycles – Worn knurling patterns cannot grip the paper evenly, leading to hidden micro-leaks.
If you are evaluating a new purchase or upgrading your current setup, pay attention to servo-driven cam timing and modular sealing head design. These features allow you to switch between cup sizes (4oz to 24oz) in under 30 minutes instead of two hours.
Is Fully Automatic Paper Cup Forming Equipment Right for Your Business?
The step-by-step process we have covered applies to both semi-automatic and fully automatic systems. The difference lies in how many manual interventions are required. Semi-automatic machines need an operator to place bottom blanks or remove finished stacks – fine for small batches under 50,000 cups per month. But for any volume above that, a fully automatic line with integrated sealing, curling, and counting pays for itself in labour savings within six months.
You also gain consistency: automatic temperature and pressure feedback loops eliminate the “good cup / bad cup” lottery that happens with manual adjustments.
From Understanding to Action
Now that you know exactly how a paper cup forming machine works – from paper feeding to rim curling – you are better equipped to troubleshoot issues, train your staff, or choose the right equipment for your production goals.
If you are looking for reliable cup forming equipment with precise temperature controls, servo-driven bottom sealing, and easy size changeover, take a closer look at MINGYUAN’s solutions. Our systems are built for 24/7 operation and come with detailed process documentation to help you avoid the common mistakes listed above. Explore MINGYUAN’s automatic cup forming line specifications and request a production capacity analysis.
Still have questions about specific sealing technologies or want to compare models? Our engineering team provides free workflow audits – just drop us a line through the product page.
Disclaimer
The technical parameters and maintenance intervals mentioned in this article are based on general industry practices (ASTM D638 for plastic coating adhesion, ISO 536 for paper grammage). Actual results may vary depending on paper quality, ambient conditions, and machine maintenance. Always refer to your equipment’s official manual for safety and operating instructions.